Installation auf Synology NAS
Die Doku für die Installation auf einem Synology NAS folgt …
Installation auf UGREEN NAS
Zunächst muss die Ordner-Struktur für immich angelegt werden:
- Hauptordner
immichim Docker-Ordner anlegen.- Darin den Ordner
library model-cache- sowie den Ordner
postgresanlegen.
- Darin den Ordner
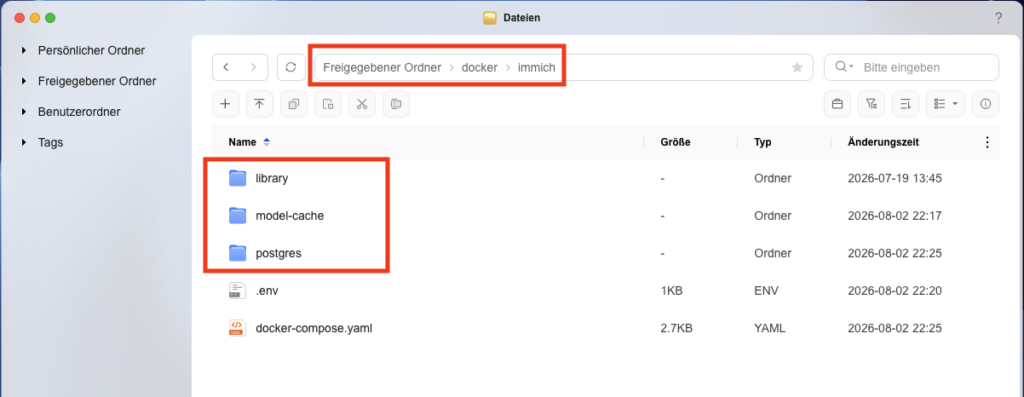
Anschließend die zwei Installationsdateien herunterladen:
- docker-compose.yml von https://github.com/immich-app/immich/releases/latest/download/docker-compose.yml
- example.env von https://github.com/immich-app/immich/releases/latest/download/example.env
Jetzt die example.env öffnen und folgender Werte anpassen:
- Zeitzone: Von
TZ=Etc/UTCaufTZ=Europe/Berlinändern. - Datenbank-Passwort anpassen:
DB_PASSWORD=postgresaufDB_PASSWORD=MeinNeuesPasswortändern.
Hinweis: Lt. Dokumentation sollen Sonderzeichen vermieden werden. - Ergänzen:
# The location where your model cache is stored
MODEL_CACHE_LOCATION=./model-cache
Soweit fertig – Datei speichern. Das Ergebnis sieht wie folgt aus:
# You can find documentation for all the supported env variables at https://docs.immich.app/install/environment-variables

# The location where your uploaded files are stored
UPLOAD_LOCATION=./library

# The location where your database files are stored. Network shares are not supported for the database
DB_DATA_LOCATION=./postgres

# To set a timezone, uncomment the next line and change Etc/UTC to a TZ identifier from this list: https://en.wikipedia.org/wiki/List_of_tz_database_time_zones#List
# TZ=Etc/UTC
TZ=Europe/Berlin

# The Immich version to use. You can pin this to a specific version like "v2.1.0"
IMMICH_VERSION=v3

# Connection secret for postgres. You should change it to a random password
# Please use only the characters `A-Za-z0-9`, without special characters or spaces
# DB_PASSWORD=postgres
DB_PASSWORD=7xTlwhpR8HMKtJprY30B

# The values below this line do not need to be changed
###################################################################################
DB_USERNAME=postgres
DB_DATABASE_NAME=immich

# The location where your model cache is stored
MODEL_CACHE_LOCATION=./model-cache
Jetzt die Datei example.env in den immich Hauptordner hochladen.
Danach die Datei example.env in .env umbenennen (siehe Bild oben).
Ist dies soweit abgeschlossen, kann über Docker der Container per Compose-Datei angelegt werden.
Projektname = immich
Und den Inhalt für das Compose-Konfiguration 1:1 aus der zweiten Datei, welche vorhin heruntergeladen wurde (docker-compose.yml), einfügen.
Einzige Anpassung: Der Speicherort des Model-Caches anpassen!
Diese sieht jetzt wie folgt aus:
#
# WARNING: To install Immich, follow our guide: https://docs.immich.app/install/docker-compose
#
# Make sure to use the docker-compose.yml of the current release:
#
# https://github.com/immich-app/immich/releases/latest/download/docker-compose.yml
#
# The compose file on main may not be compatible with the latest release.

name: immich

services:
  immich-server:
    container_name: immich_server
    image: ghcr.io/immich-app/immich-server:${IMMICH_VERSION:-release}
    # extends:
    #   file: hwaccel.transcoding.yml
    #   service: cpu # set to one of [nvenc, quicksync, rkmpp, vaapi, vaapi-wsl] for accelerated transcoding
    volumes:
      # Do not edit the next line. If you want to change the media storage location on your system, edit the value of UPLOAD_LOCATION in the .env file
      - ${UPLOAD_LOCATION}:/data
      - /etc/localtime:/etc/localtime:ro
    env_file:
      - .env
    ports:
      - '2283:2283'
    depends_on:
      - redis
      - database
    restart: always
    healthcheck:
      disable: false

  immich-machine-learning:
    container_name: immich_machine_learning
    # For hardware acceleration, add one of -[armnn, cuda, rocm, openvino, rknn] to the image tag.
    # Example tag: ${IMMICH_VERSION:-release}-cuda
    image: ghcr.io/immich-app/immich-machine-learning:${IMMICH_VERSION:-release}
    # extends: # uncomment this section for hardware acceleration - see https://docs.immich.app/features/ml-hardware-acceleration
    #   file: hwaccel.ml.yml
    #   service: cpu # set to one of [armnn, cuda, rocm, openvino, openvino-wsl, rknn] for accelerated inference - use the `-wsl` version for WSL2 where applicable
    volumes:
      # - model-cache:/cache
      - ${MODEL_CACHE_LOCATION}:/cache
    env_file:
      - .env
    restart: always
    healthcheck:
      disable: false

  redis:
    container_name: immich_redis
    image: docker.io/valkey/valkey:9@sha256:4963247afc4cd33c7d3b2d2816b9f7f8eeebab148d29056c2ca4d7cbc966f2d9
    healthcheck:
      test: redis-cli ping || exit 1
    restart: always

  database:
    container_name: immich_postgres
    image: ghcr.io/immich-app/postgres:14-vectorchord0.4.3-pgvectors0.2.0@sha256:bcf63357191b76a916ae5eb93464d65c07511da41e3bf7a8416db519b40b1c23
    environment:
      POSTGRES_PASSWORD: ${DB_PASSWORD}
      POSTGRES_USER: ${DB_USERNAME}
      POSTGRES_DB: ${DB_DATABASE_NAME}
      POSTGRES_INITDB_ARGS: '--data-checksums'
      # Uncomment the DB_STORAGE_TYPE: 'HDD' var if your database isn't stored on SSDs
      # DB_STORAGE_TYPE: 'HDD'
    volumes:
      # Do not edit the next line. If you want to change the database storage location on your system, edit the value of DB_DATA_LOCATION in the .env file
      - ${DB_DATA_LOCATION}:/var/lib/postgresql/data
    shm_size: 128mb
    restart: always
    healthcheck:
      disable: false
Fertig.
Jetzt nur noch das Projekt starten und einen Augenblick Geduld, bis die Erstinstallation beim ersten Start durchgeführt wurde.